Product Updates Updates

Multiple widget updates πŸš€

by Laurent Pellegrino, Founder & CEO
Announcement
Widgets

We have made several improvements to the Widget:

  1. Its definition is smaller. Fewer data to fetch, less time to first display. The Widget is now speedier than ever πŸ—²

  2. Setup instructions have been updated to reference a new script element. Instead of 4 line of codes, a single is now required to import the Widget definition:

    <script async defer src="https://cdn.noticeable.io/v1/noticeable-widget.js"></script>
    

    The async and defer attributes guarantee the content is loaded in parallel and executed after your page is parsed, no matter where the import is placed in.

    Although we recommend switching to the new import script, old ones remain available but are deprecated.

  3. Unread posts displayed in the Widget popup now include a left border. This allows distinguishing unread messages from read ones:
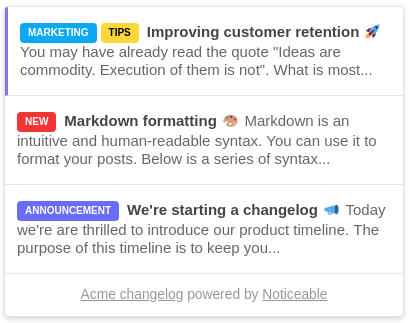
    Noticeable Widget Updates

    The color of the left border is based on the project accent color but can be changed programmatically. You can set it transparent to mimic the old style:

    <custom-style>
        <style>
            noticeable-widget {
                --noticeable-widget-popup-entry-unread-border-color: transparent !important;
            }
        </style>
    </custom-style>
    
  4. Widget but also Timeline code snippets are rendered with the Atom One Dark style to improve readability.
Share buttons πŸ”˜

by Laurent Pellegrino, Founder & CEO
New

When you open a post in your Timeline, share buttons are displayed by default on the left. Until now, only 2 were available: Twitter and Facebook. Today, we have added LinkedIn!

share_buttons

Following the recent data privacy scandal with Facebook, we are happy to provide a new option in your Timeline configuration page that allows selecting which share buttons must appear.

Embeddable Noticeable timelines πŸ“‹

by Laurent Pellegrino, Founder & CEO
New

Noticeable Timelines centralize your product updates. Today, we have deployed a new version of the app that allows embedding Timelines in your own pages.

Any Noticeable Timeline can be embedded into a full page of your website, rather than hosting it on a subdomain. For this purpose, we allow serving Timeline content from an iframe.

Below is a link to a Github repository that provides an example:

https://github.com/noticeableapp/noticeable-timeline-iframe

Timelines also support some options via Query string parameters:

ParameterValueDescription
cachefalseLoad content from Noticeable servers bypassing caching layers. This ensures data freshness at the cost of higher response times.
footerfalseHide the Timeline footer.
headerfalseHide the Timeline header.

For instance, here is the official Noticeable Timeline with header and footer hidden:

https://updates.noticeable.io?footer=false&header=false

Importing posts from Headwayapp πŸ’«

by Laurent Pellegrino, Founder & CEO
New

We are receiving more and more requests from people and companies who are interested in switching from Headwayapp to Noticeable. Is it also your case? As from Today, we provide a wizard for this purpose.

How is this new feature working?

  1. Open our Importation Wizard.
  2. Select a Noticeable project, then click on "Get started".
  3. Enter your Headwayapp changelog URL.
  4. Click on "Begin Import".

The importation is fully asynchronous. This means you can continue working on other tasks, and even close your browser, while posts are fetched and published on your Noticeable project.

You will receive an email once the importation is finished.

Widget auto refresh πŸ”„

by Laurent Pellegrino, Founder & CEO
New

Are customers keeping your product pages opened for a long time without reloading? In such a situation the Noticeable Widget is now automatically refreshing its content every hour.

The auto refresh period is configurable. As for other Widget properties, you can set its value from your configuration page on Noticeable:

  1. Open a project from your dashboard.
  2. Select Widget in the sub-menu.
  3. Set your value in the Auto refresh field (in minutes).

or programmatically (in milliseconds):

<noticeable-widget 
    auto-refresh="3600000"
    access-token="YOUR_ACCESS_TOKEN" 
    project-id="YOUR_PROJECT_ID"></noticeable-widget>

The refresh period cannot be lower than 1 minute. If you want to disable the auto refresh feature, you simply need to set the value to -1.

Although requests are cached by a first class Content Delivery Network (CDN) by default, please note that reducing the auto refresh value will in most cases increase cache invalidations and thus affect your API calls quota.

Multiple language support πŸ‡«πŸ‡· πŸ‡ͺπŸ‡ΈπŸ‡ΊπŸ‡Έ

by Laurent Pellegrino, Founder & CEO
New

Hola, ΒΏque tal? Was geht? Γ‡a va?

Your app or service is available in multiple countries and you want to improve customers engagement by sharing what's new in multiple languages? Noticeable now has full support for this purpose. You can write posts in Chinese, English, Hindi, Spanish, French, etc. there are no limits.

How does it work?

You simply need to create a dedicated project per language. Once created, you can override all default texts used on your project Timeline and Widget. There is an exception with texts related to date and time. These last are automatically translated based on the user locale that is detected on the browser.

Managing multi-language per project has several benefits: you can customize default texts but also labels, collaborator permissions and many other options.

Don't wait to share updates, your users will love you, we promise.

User segmentation 🎯

by Laurent Pellegrino, Founder & CEO
New

Noticeable allows keeping your users in the loop about your product. Thanks to the In-product widget, users are notified about new changes in the right context and at the right time. However, what if you schedule a maintenance for your product in Paris and you want to publish an update to users who are located in this city only? That's where user segmentation comes to the rescue :)

Segmentation is a seemingly simple but extremely powerful mechanism.

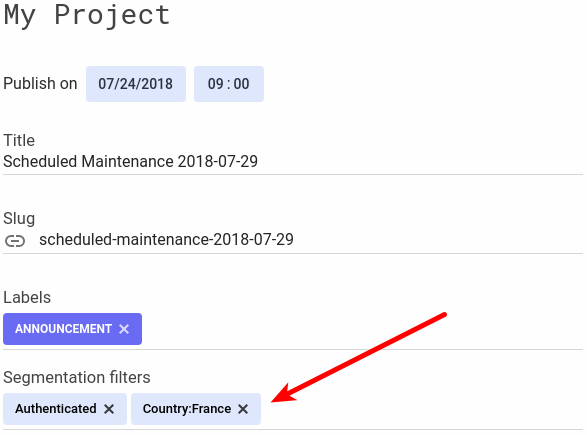
When you publish a post, you may define segmentation filters, aka segments:

Screenshot from 2018-07-24 12-53-48.png

Then, based on users who are browsing your pages, you simply need to configure the Widget with the desired segments. You can do it statically:

<noticeable-widget 
    access-token="YOUR_ACCESS_TOKEN" 
    project-id="YOUR_PROJECT_ID"
    segments="Authenticated,Country:France"></noticeable-widget>

or dynamically:

document.addEventListener('noticeable-widget-created', function(e) {
    e.target.setSegments(['Authenticated', 'Country:France']);
});

It's just that easy! Segmentation filters defined on posts need to match at least one segment configured with the Widget in order to be displayed.

Posts with no segmentation filters are displayed to all but posts with segments are displayed to users who match the segments only. Timelines do not display posts which are segmented.

You can also target a specific user if the user email or identifier is used as a segment value.

User segmentation is available with the Business and Agency plans starting Today.

Timeline subscribers management

by Laurent Pellegrino, Founder & CEO
New

Noticeable allows collecting email from users who are interested in receiving updates by email. Until now, these subscriptions were forwarded to integrations and the total number displayed in your private Timeline configuration area. However, it was not possible to delete entries or get access to raw data.

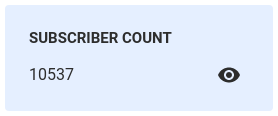
Starting Today, we are happy to introduce a new page that enables subscriptions management. When you have at least one subscriber, you will notice a new icon that appears next to the subscriber count:

New Icon

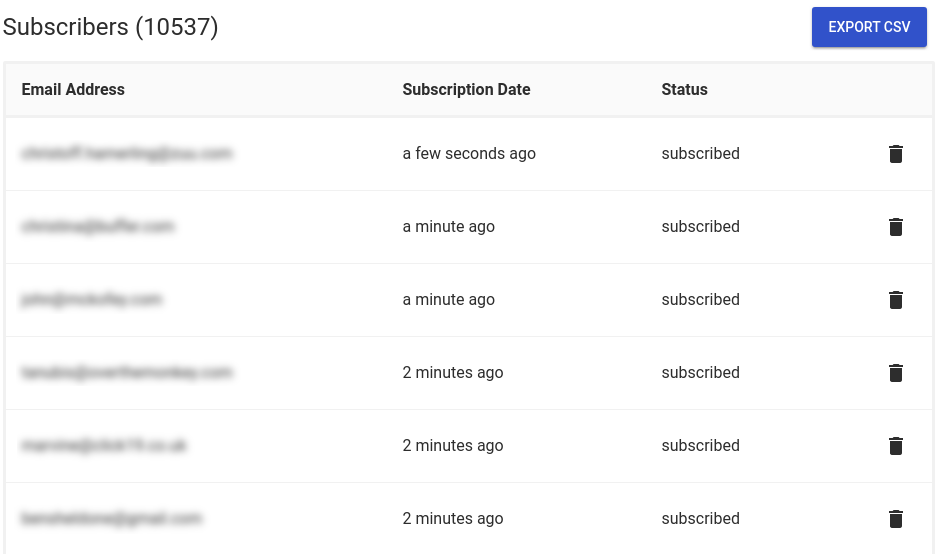
Upon click on the icon, you get access to a new page that lists all subscriptions starting from the most recent. You can also delete subscriptions and download your entire list as a CSV file:

export-subscribers.png

Scheduled updates ⏰

by Laurent Pellegrino, Founder & CEO
New

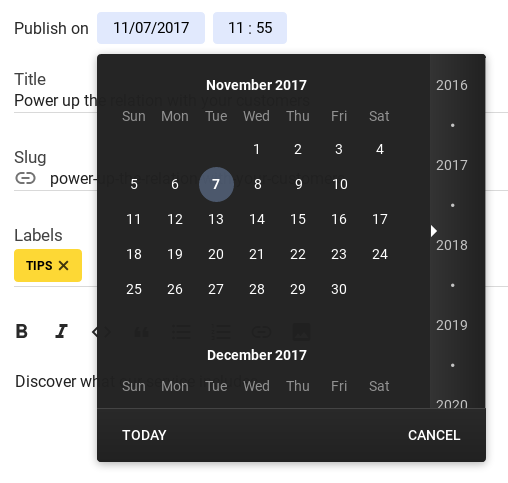
Timing is incredibly important for organic reach but also the overall success of the content you're posting. Starting Today, you can schedule the publication of your posts.

Capture d’écran de 2018-01-18 15-30-48.png

Once the date time set, you're good to go! Scheduled posts won't be shown, neither forwarded to integrations until the date you choose.

Since nobody is perfect, you can also backdate your posts.